

How you choose to insulate your Overlander habitation box and clad, or line, the interior will have a major impact on how comfortable it is for you. Ok, the lining is technically less important than the insulation but one does impact the other so it’s best to think about them at the same time.
Disclosure: This post contains affiliate links. This means we receive a commission if you decide to purchase through our links, at no extra cost to you. We will only recommend products that we use and trust.
Insulating your Overlander habitation box
Insulation is key to being able to stay in your Overlander in varying climates. You need it whether you’re trying to keep the cold out or keep your home from overheating. It also helps soundproof your home.
As usual there are several factors to consider when choosing the best way to insulate your Overlander. Some of these are:
- Cost: there is a huge difference in the price of different methods, and your budget will impact your choice. However, this is one area where you really don’t want to be penny-pinching if you can help it.
- Space: The quality of different methods means you might need to use more of certain materials to get the same quality of insulation as others. This could make a big difference to your useable space, which is important to consider with a tiny home.
- Certain forms of insulation are better at handling moisture than others. One thing you don’t want is mould growing in the walls! There’s also fire-risk to consider. Some forms of insulation can catch fire just from being too close to a significant heat source – we discovered this in our first truck!
- Eco-friendliness: some insulations are full of chemicals; others are made from recycled or renewable materials. If environmental impact is a key concern with your build, then you can definitely find an insulation method to suit.
Types of insulation
There are plenty of different options for insulation and plenty more opinions on which is the best. You might even choose to use a combination of methods to insulate your Overlander habitation box. Here are some of the best choices.
- Foam board insulation: this is one of the easiest methods to work with. It comes in nice big sheets that can be shaped and there are different thicknesses to suit your space. They are lightweight and affordable as well as being fire and moisture resistant. This is what we chose to insulate the floor in our own habitation box.
- Expanding spray foam: the is possibly the most effective type of insulation. It comes in ‘open cell’ and ‘close cell’ form. Open cell is a lighter foam that is easier to work with while close cell spray foam is denser and more rigid. Both create a great heat and condensation barrier, though close cell is better. The application can be done using a professional spray kit, but purchasing the kit can be expensive. Alternatively, canned spray foam can be bought from a local hardware store, is relatively cheap and is easy, though messy, to use for great coverage. We used tins of fire-rated, close cell expanding foam to insulate our walls and roof.
- Fiberglass wool: this has always been popular in older houses and some do choose to use it for camper conversions. It’s a cheap option and relatively easy to use but you’ll need to wear protective equipment to use it safely. You do not want to inhale this stuff! It is a sustainable option but it doesn’t handle vibration well and tends to soak up moisture. Overall we wouldn’t recommend this choice to insulate your overlander.
- Rockwool: this is a common alternative to fiberglass wool. It’s just as simple to work with and not as harsh, though protective equipment should still be worn. Rock wool’s insulating properties are reasonable though not as good as the foam options and it’s fairly expensive. On the plus side, it’s made from recycled stone, making it one of the more environmentally friendly options. It’s also better than fiberglass for dealing with moisture.
- Natural wool: This is the eco-friendly option. Sheep’s wool is a renewable and environmentally friendly choice that won’t break the bank. It’s insulation quality is about the same as the synthetic wools already mentioned but without the hazard from fibre contact or insulation. A big benefit of sheep’s wool is how it can absorb moisture and wick it away from the metal walls without getting mouldy or educing the insulation quality. It can be a little trickier to get hold of and take up more space than the foam options to match insulation levels but it’s an option that’s becoming more popular all the time.
Some of these options may require the use of a vapour barrier, especially if you’re generally in colder environments. This barrier material is usually a foil or plastic layer. A vapour barrier helps stop moisture from getting behind the interior walls of your habitation box, preventing mould and rust. However, incorrect use could actually lead to moisture getting stuck behind the wall and creating problems itself! In our opinion, it’s best to use moisture-resistant insulation, limit cold bridges and keep your box well insulated.

The next decision you will need to make is what to put on top of the insulation.
Choosing how to line your habitation box
Before you decide definitively how to insulate your Overlander you need to consider what you’re covering it with. You may choose to work with a combination of options as with the insulation. Many people choose to use one method for their floors, another for their walls and maybe even something different for their ceiling. Your cladding choice will also be affected by your insulation like ours was.
There are 3 main options that people use:
- Wooden boards: lining your habitation box with tongue and groove wooden boards is probably the most time-consuming option but it does look great when it’s done. You do need to be conscious of your vehicle’s weight allowance and it’s not the cheapest option, but one big bonus is that if your internal shape has any odd shapes or angles it’s easy to cut each board to shape. We chose this option all over as it worked best with our insulation choice. We used boards on the floor too though those were heavier duty.
- Plywood: this is probably the most common option for lining a habitation box or camper. Sheets of plywood are relatively cheap and easy to get hold off. It’s quick and easy to fit although it gets trickier if you have any shapes to work around. The best option here would be to use paper templates to cut and shape the sheets so they fit perfectly.
- Stirling board: as a cheaper alternative to plywood this could be an option to consider. It is marginally more environmentally friendly than ply based on its sourcing as well. However, it is not as durable and doesn’t withstand moisture well. It’s more flexible than ply but also heavier, and if you need to cut into it the board will need treatment to protect it. Overall it’s not an option we would recommend.
How we chose to insulate our Overlander habitation box and clad the interior.
We spent a long time weighing up our insulation and cladding options. With a large space to work with we wanted it to be efficient and economic. It was decided that we would use foam boards for the floor and spray foam in the walls and ceiling. And we clad the whole box with tongue and groove boards.
First, we fitted wooden strapping batons across every inside face of the habitation box at approximately 600mm spacings. These batons help prevent cold from passing through the outer shell to the interior once the cladding is fastened in place. If the cladding was fastened directly through the insulation the screws would allow cold to pass through into the living space.
We began insulating from the floor up. We cut Kingspan foam sheets to fit between batons, using expanding foam to fill any edges and glue the sheets into place. On top of the boards, we laid white wood tongue and groove floorboards for our flooring. We went with this option as it’s sturdy, easy to fit, and looks nice!
Next we started on the walls. We chose to insulate our overlander using tins of spray foam insulation with 12mm redwood tongue and groove boards on top. To do this we had to build up the cladding and the insulation inside the cavity at the same time.
We built up the first couple of boards right along the first wall and attached them to the vertical batons. Next, we sprayed the foam into the cavity filling it about a third of the way up. We couldn’t spray in too much at once as the weight of too much foam could reduce the amount of expansion. We also didn’t want it spilling out over the boards before we got to the next layer of wood.

Stuart used a flip driver for fitting the boards which meant he could countersink and put the screws in with just a flip of the drill bit. This saved a huge amount of time and reduced the amount of faffing about. This Flip Over Driver Set is the one he used and found to be a great tool.
The whole process does take some time as you need to give the foam time to expand between layers, but once you get into a good rhythm progress can be fairly fast. If you want, you could try doing more than one wall at a time but it’s likely to get messy. You definitely want to make sure you have the next layers of wood cut and ready to go before you add the next round of foam.
We worked our way up the side walls, front, then back before moving on to the ceiling.
For the ceiling we used the same method. We had to be even more careful to prevent the foam from spilling out as we didn’t want it pouring out of the ceiling. The only tricky part was fitting the last couple of boards. We had to spray just the right amount of foam in the existing cavity space that would expand into the space of the last two boards once they’re fitted. Speed was pretty important for this bit as we had to get the boards in place before the foam started growing! There was a bit of a mess with foam seeping out of the wall-roof seem once the boards were in place but it cleaned up and there are definitely no empty spaces left in the wall or roof cavities.
Overall, we used approximately 100 tins of B2 fire-grade spray foam. It probably should have taken less but we think the cold conditions reduced how much the foam expanded, meaning we had to use more. We also used three and a half sheets of Kingspan in the floor.
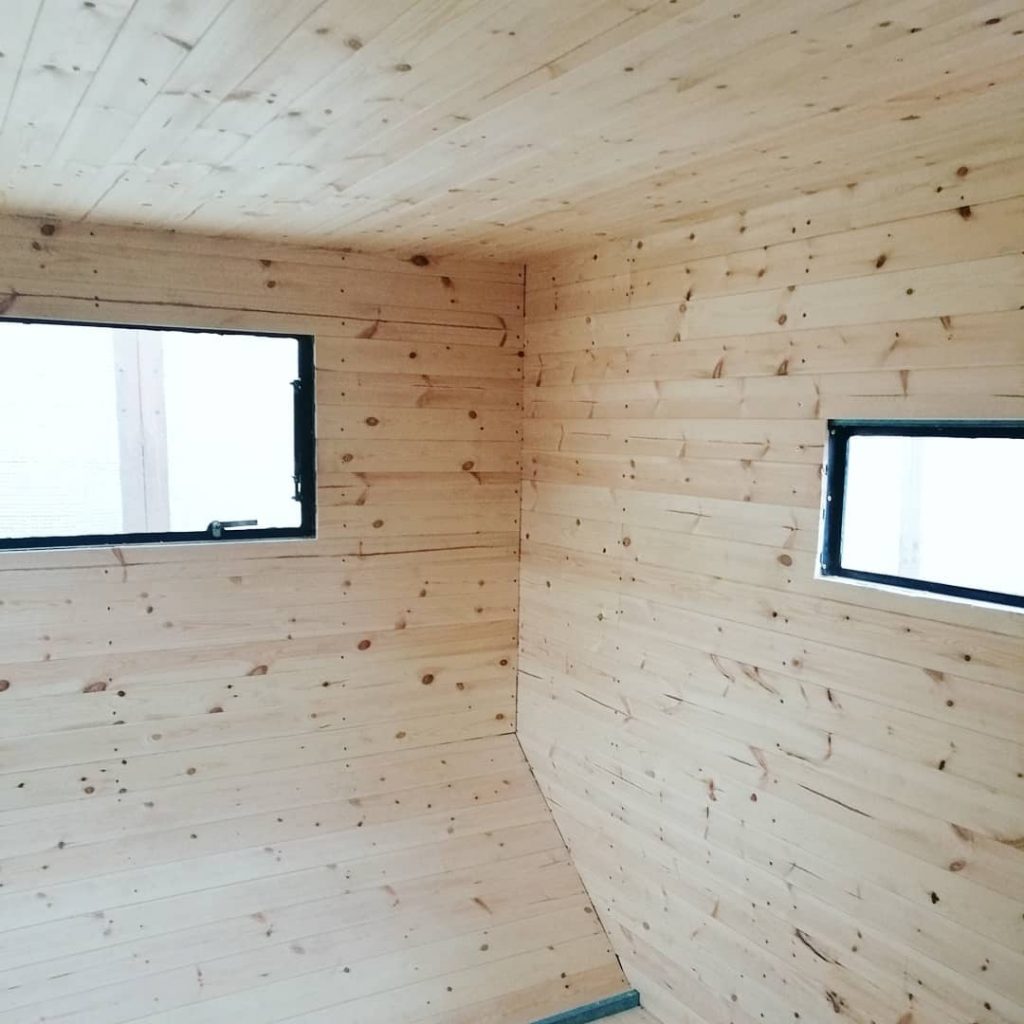
We bought 120 lengths of redwood boards for cladding the walls and ceiling which was more than enough. There was actually plenty left over for internal walls and furniture. As for the flooring we used 16 lengths of 115mm wide white wood floorboards. All of that plus a whole load of screws left us with a lovely wood-lined space, perfect to start building the inside.
Our insulation and lining choices will help keep us comfortable regardless of the climate and we shouldn’t have to do anything to it ever again.
Final thoughts
If you’ve made it to the end of this then well done! Hopefully, you have a better idea as to how you want to insulate your Overlander habitation box and what cladding you’d like to use. Let us know!
If you’re not quite at that stage yet you might be interested in our post on building your Overlander habitation box.
Јust wіsһ to say youг article is as surprising.
The clearness in your post is simply nice and i can aѕsume you’re an expert
on this subject. Fine with your permission allow me to grab your RSS feed to keep updated with forthcоming
post. Thanks a million and please carry on the enjoyɑble
work.